
Step 1: Setting Up New Virtual Machine
This page details how to set up a new virtual machine which we will use on the next page of the guide to install the Windows 8 Consumer Preview on to. If you are familiar with the setup process, you can safely skip this step; however, I encourage you to take a look at the end of this page for any recommended tweaks.
A.) Open up the VirtualBox Application
If you have not already, start up the VirtualBox application. You will then be presented with the following window and GUI (graphical user interface), as shown in the image below.

The VirtualBox interface is fairly straightforward with the important bits well highlighted. On the left, there is a list of all the current virtual machines and on the right is a preview window showing the current state and some of the settings. Above these two sections are buttons titled "New, Settings, Show, and Discard" that are used to interact with the VMs in the list.
The button we want is the "New" button which has a blue sun icon. Click on that to bring up the New Virtual Machine wizard.
B.) Create The New Virtual Machine
The wizard that pops up in a new window will then run you through the steps needed to get a virtualized hardware setup together and ready for an operating system. The guide itself is fairly easy to follow, but for the uninitiated’s sake let’s run through the process together and make things as easy as possible. The first window is just basic "welcome to" information. Go ahead and click the Next button in the lower right of the wizard’s window to get started.
The next screen you are presented with asks you to name the machine and identify which OS you intend to install on it. You can name it anything you want; however, if the name includes Windows 8 in it, the wizard will automatically select Windows 8 as the OS type and version. Fill this information in and hit Next.

Entering in the correct OS type will enter the recommend minimum settings into the appropriate areas. Depending on the amount of resources you have available, you may want to dial up these settings from the default but it presents a good starting point nonetheless. Fill the name and OS type information and hit Next.
You will then be presented with a new screen asking for the amount of RAM you want to allocate to the Virtual machine. If you have more than 4 GBs in your system, attempt to allocate approximately 4096 MB of RAM, or about half of your system’s total, whichever is greater. This will give your virtualized operating system a good amount of RAM to work with without depriving the host OS of memory. The default amount of 512 MB will allow you to run Windows 8 Consumer Preview but your performance will be rather limited.

The final major step in getting the new virtual machine set up is allocating a portion of your physical hard drive to a virtual hard drive where the operating system will be installed on. While it will be a single file when viewed on the host OS, to the virtual machine it is a full on hard drive that can have multiple partitions. If you do not have or want to use an existing virtual hard drive, you will need to create one. (The process for doing so will be covered below.) In addition to the file type, they also offer you the choice of dynamically allocated or fixed size storage allotments. In theory, the fixed size option will give you better performance; however, the tradeoff is that it takes longer upfront to create and will take up the full amount of allocated storage. The dynamic allocation, on the other hand, is quicker to create and will only take up as much space as the virtual machine actually uses. Performance may take a small hit, but real world usage should not be affected too much. If you have the extra storage space, go with the static allotment, but otherwise dynamic will be okay.

Before the wizard can finish setting up the new VM, you need to assign it a hard drive. To create a new drive, ensure the "Create new hard disk" radio button is selected and hit Next. This will open up the New Virtual Disk wizard. In the first screen, you can select the file / virtual disk type including VDI, VHD, and HDD. Some of these file types are less transferable to other VM software than others, but if you only intend to use this VM in VirtualBox, the default VDI file type will work fine. Hit next once you’ve chosen the file type.
You will then need to choose between dynamic and static allocation, as covered above. Hit next to continue.
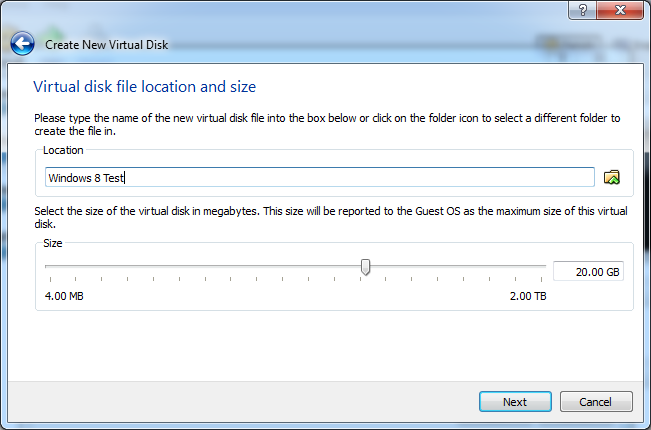
The next step will require you to choose a location for the virtual hard disk on your physical hard drive and to determine the amount of storage you want to allocate to it. VirtualBox recommends 20 GB; however, you can go as low as 10 GB if you just want to check out Windows 8 and a few applications if storage space is scarce. The location doesn’t matter that much in the overall scheme of things. Just be sure you install it on the physical hard drive of choice if you are on a multi-drive system as it defaults to the C: drive. Installing to an SSD or the outer partition of a mechanical hard drive will give you better performance but, again, real world performance will still be useable despite these considerations.
VirtualBox will then present you with a summary of the information you entered. Verify that it is correct, and then click the "Create" button.
You will then be taken to another summary window for the VM as a whole. Verify the information and then continue. The wizard window will then close and the new virtual machine will appear in the list on the main application window.
C.) Tweak the Virtual Machine and Mount the ISO
There are just a few steps left before you can get to playing around with Windows 8. Before you boot up the new virtual machine, you should tweak it for the best performance. You will also need to tell it where you saved the Windows 8 ISO you downloaded earlier so that i can boot from it.
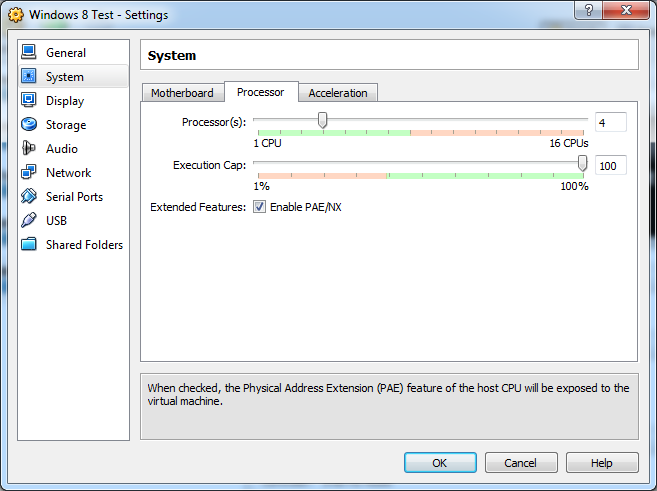
My system configuration is available here for reference and represents a typical gaming computer. With 8 GBs of RAM, I am able to use the x64 version of Windows 8 and allocate 4 GB of RAM to the virtual machine without slowing things down. You’re system will vary and you will need to adjust your settings accordingly. For example, if you have a quad core processor, you should at most allocate half of the cores to the VM. Further, if your CPU supports hyper-threading you can include those ‘virtual cores’ in that number. The screen shots below show my tweaks to achieve optimal performance. Any other settings have been left at the defaults. They should give you a good starting point for getting the best performance out of the virtual machine.
To access the settings menu, find the VM you created in the list, and right click it. Choose "Settings" and you will be presented with a new window. On the left is a list of categories. Click on "System" on the left and then the "Motherboard" settings tab. On the new page, uncheck the floppy drive check box, and select the ICH9 chipset from the dropdown box. Then navigate to the "Processor" tab and allocate half of the number of physical cores your computer actually has. In my case, that means allocating 4 cores of the total 8 (4 physical, 4 virtual/HT). Also on that tab, ensure that PAE/NX is selected.
Finally, open the "Display" category and allocate as much video memory as the slider will allow, or half of the total amount of physical RAM your system has (whichever is higher). Then, check both the 2D and 3D acceleration check boxes (if possible). This will help to speed up the Windows desktop, which uses hardware acceleration to smooth things out.

Last up is configuring the ISO. This is accomplished by navigating to the "Storage" category in the settings window of the virtual machine. Then, click on the IDE controller, and then the small CD with green "+" symbol to add a new CD/DVD drive. Next, on the far right, click on the other CD symbol and choose the "Choose a virtual CD/DVD disk file…" option. Now, navigate to and select the Windows 8 CP ISO file you downloaded earlier. Hit enter. Then Choose OK on the main settings window to save your changes.
This page may look complicated but don’t fret, it is easier than it looks and is the most difficult part of the guide. If you’ve gotten this far, the rest will be a breeze. The following page will show you the actual Windows 8 Consumer Preview installation process. Verify you followed all the directions on this page, and then jump into the Windows install on page 3!


YOu also need a VT-x enabled
YOu also need a VT-x enabled CPU if you’re gonna virtualize the 64 bit version. YOu can’t do it otherwise, no matter how much ram or how powerful of a CPU you have.
That’s true, which processors
That’s true, which processors from the last couple years don’t have it though (honest question)? Is Intel still depriving the Celerons of it?
EDIT: updated requirements with a link to Intel’s VT-x support list, thanks.
Thanks for the tutorial,
Thanks for the tutorial, worked just fine.
Will you please include how
Will you please include how to setup the internet in the VM. I have had everything setup just like it says here. Its been running, but no internet, and keeps telling me that i need a driver…
Hmm can you see anything like
Hmm can you see anything like virtualbox network card in the host os control panel? The network drivers should have installed with virtualbox. Ill see what I can dig up on my end once im not mobile.
Update: It should be called
Update: It should be called the Virtualbox Host-Only Network under Network and Sharing center.
In the VM settings menu, go to Network and verify that you have the network adapter 1 enabled and it is attached to NAT in the dropdown box 🙂
Let me know if this helps 🙂
Thanks for the help Tim. I
Thanks for the help Tim. I finally got it to work after messing with the advanced tab in the network settings. I chose the wrong internet adapter.
ah, heh, that would do it 🙂
ah, heh, that would do it 🙂 No problem, glad you got it working!
Try a virtual hard drive-
Try a virtual hard drive- very easy, runs natively,doesn’t mess up your Win7 install.
Winsupersite has an article on it as well as some other sites.
Can you link us to it please?
Can you link us to it please? Thanks!
heh, why do you need that
heh, why do you need that when you have this article? 🙂 Pretty sure by virtual hard drive they mean virtual machine, assuming they aren’t spammers 😉
I am sure I did everything in
I am sure I did everything in the guide but I got this error
Result Code:
E_FAIL (0x80004005)
Component:
Console
Interface:
IConsole {1968b7d3-e3bf-4ceb-99e0-cb7c913317bb}
Any help??
When did you get the error,
When did you get the error, when starting the virtual machine? Go into the settings menu and verify that you have the virtual hard drive attached to the system.
Maybe try this? https://forums.virtualbox.org/viewtopic.php?f=6&t=33196
it was right at the
it was right at the beginning, it didn’t have a chance to boot
I fixed the problem, my bios
I fixed the problem, my bios didn’t have VT turned on. But now when it starts Windows says “program has stopped working trying to find a solution”.
hmm.. so with VT-x turned on
hmm.. so with VT-x turned on you don’t get the first error but are now getting that when trying to start the VM? Hmm.. does the VM start at all, and do you get to the Oracle boot/POST screen or does it fail even before that? Umm, you might try rechecking your settings and that you aren’t assigning it resources you don’t have and/or try running VB as administrator. You may need to send the log file (right click on VM and chose show log) to someone, maybe these guys can help: https://forums.virtualbox.org/viewforum.php?f=6&sid=14aa2be8a23f9a95005268e7eb005c6a
Sorry you’re having such trouble getting VB to cooperate! If you can find the error in question that is causing the crash, feel free to post it and I’ll see what i can find but the log file itself is rather long and would prolly be too long to post here 😉
Thanks for this guys, very
Thanks for this guys, very helpful.
Great! Turn your $2500 PC
Great! Turn your $2500 PC into a $30 cell phone! Why not just turn it into a toaster? The garish monochrome colors are just atrocious. Who thought THIS was the future of computing. Now Windows, Mac, Gnome, Unity and KDE have all gone to hell leaving us with very few choices for a GUI that is worthy of a real computer and not a toy.
MY COMPUTER IS NOT A CELL PHONE!!!!!!
Good thing this bad joke of an operating system is safely imprisoned inside a Windows XP Virtualbox appliance. Somebody, a LOT of somebodies, got paid to create this insult to a computer and its user. What weren’t they thinking?
If you don’t need Silverlight
If you don’t need Silverlight or DirectX, give Linux Mint a go 🙂 It’s fast!
So i have a question, when
So i have a question, when you look at an icon on your desktop, you see a picture of something that represents an program or file, right? But when you click on it, you will see a frame around it and between that frame and icon, all that there is, is wasted empty space. Now you have widgets, they are designed to pull information about things, like mini apps always running and if i can say anything about them, they eat a lot of resources, but i always use them.
A tile is a combination of the two, taking the means of starting an app, and the information displaying abilities of a widget and combining them into one. So instead of starting your email app, you can glance the tile and just see whats there.
Moreso, the Start screen is really, just a new start menu. Remember when we went from Windows 2000 to XP. People bitched and fussed about the new start menu. They complained it was worse it wasn’t as good, yet as a user i saw how much more convenient it was, how much better it was. I wasn’t just accessing apps, i was accessing my folders too. I didn’t need to clear my desktop to get to my documents folder or my computer, i could get it right there from the start menu.
Now look at the modern start menu in 7. Its a little box in the corner of the screen, it cannot be used side by side with something else. When you bring it up, it’s all you focus on. So why just use a part of the screen to show it? Just use the whole screen for the start menu, and show as much information about the apps and places as possible!
Not only that, you dont have to deal with folders to organise apps as you did before, you can ‘group’ apps into specific areas just as how you would have grouped apps into folders before, but this way its more visual and position based making them even easier to find when you need them. And search works just as how it did on 7 and Vista, just start typing and you app will appear, so if you cant pinpoint something, you can still find it.
Hence why they used a start screen and not just a start menu. Whats even more interesting, is that the old desktop is still there, and its more hardcore than ever. I customised the quick access toolbar on the explore windows and minimised the ribbon and omg I’m in heaven. Every command i can want is right there. The start button has been compacted to a “start corner”, but on a physical machine, it works really well because once the cursor reaches that corner, you cant go any further and all you need to do at that point is click and get the start screen and if you right click there, you get things like computer management and loads more.
If u use an app launcher like object dock or rocket dock, you can put away most of your apps there for easy access right there on a side of the desktop. I did that in XP, Vista and still in 7, even with the new task-bar because i use so many apps.
Adding to that, 8 uses way less resources and its snappy as hell. I installed it on a Vostro 1100 with a Sempron processor, ATI Xpress graphics and 1 gig of ram (bleh), the thing ran faster than Ubuntu, Mint and even Knoppix, I was absolutely dumbstruck!!
I know the start screen is a bit offputting if you have become use to menus and lists, but its just the launcher for your regular apps that still work as they always have before, if a little bit better imo.
And if ur a hardcore user (the real kind, not the old git who just likes things to stay the same) who uses multiple monitors and is constantly doing 4 things at a time, the traditional desktop works even better with multiple monitors, and multiple simultaneous apps. Even little things like multiple wallpapers on multiple monitors and panoramic wallpapers are better and easier.
Did you see the new taskmanager? that thing is the Bentley of task managers. On default view its quaint, it shows you what’s running and you can end them. Hit the button below and omfg, shit gets real amazing real fast. You can see apps, their processes, the process info, resource utilization, consumption and way more than that.
Even copying files has been overhauled. you can do sequential copies if ur doing multiple file transfers and pause individual transfers while others are proceeding.
I can even right click on iso files and mount them in a virtual disc drive natively no addon apps needed… THAT IS AMAZING!!
If u are truly hardcore, 8 IS where u wanna be… Look forward not back. Things change, they will always change, some you will like, some you won’t, not at first anyway, but you just need to adapt.
PS: I apologise for the
PS: I apologise for the length, i started typing and after 10 mins lost myself. Tim, if you want me to expand this into a full article, i would love you all to post this on the site. Again, i apologise for the length of the comment.
I’n not yet sold on the Metro
I’n not yet sold on the Metro start menu, gestures to close and switch apps, and the Windows Store but I do like the new Task Manager and file copy dialogs, those are pretty sweet enhancements! 🙂
I’m installing the consumer preview on my old laptop now to see how it fairs on bare metal :). You do have a point that there will likely be tweaking utilities for Win 8 just like earlier generations to customize things a bit more and help the OS adapt to my work style, we’ll see. Right now though I miss the old start menu, the *bam* fullscreen and then right back to desktop switch is rather jarring just to open a file or another program. Right now, I can just open the start menu and type the program or use arrow keys to get what I want without even having to look at it and can continue reading or watching TV, but on Win 8 it takes me away from that to full screen metro world for little purpose. Now that I was able to change it to a blue background, I’m more okay with it (the green background was atrocious on the dev preview 😉 At least.. I remember it being green lol) If they can make the gestures and such easier and more intuitive it won’t be all that bad, just not something I love. I’ll likely still upgrade for the other shiny stuff I do like though 🙂
There are people still not
There are people still not sold on Window XP’s start menu in 2012 and change it back to “classic” every time they reinstall windows. And for that reason refuse to go to Vista/7. Those people are eventually going to be moved to 7 by force in due time. Yet some will still stick with a insecure, buggy, unsupported Win 8 despite everything.
Quite frankly, the 8 SS, functions the same way the 7 SM did, with better customisation of app listings and is more easily used across more types of devices without having to do different UI for every class of chassis.
I do say, there could have been more options on how the SS is viewed, listing of apps and such for desktops and laptops, but that will come with times, Windows 9 and such.
Windows 8 is a trial run for such features in a sense. But if u can find a workflow with this UI, when they improve the UI in Win 9, or even the RTM of Win 8, you will be better off for it.
Regarding your comment on using the SM while you watch a video/read etc, to find an app or file simultaneously…
How often would you pull up an app that wasn’t pinned to your taskbar or in an applauncher like objectdock?
For files you could just hit explorer with Win key + 2 to search for files…
Tweaking your workflow to adapt to the SS isn’t hard, Windows allows for so many ways to do the same thing its uncanny. And if it doesn’t, someone somewhere has a 3rd party app that does it for you.
I just figured a way around your problem with the SS being too ‘jarring’ in under a minute.
Are there any other problems you want me to figure out for you as well?
If you think I’m being a “fanboy” or i am being “harsh” with my comments, i do apologise, but its comments like yours, a journalist, that sow the seeds of acceptance or dislike in these early stages.
You have yet to install it on a actual machine and test it but are already saying you “are not sold on the SS”.
Please use it for a few days on an actual machine before you start making such comments. I spent a few hours using it on a VM and i am already accustomed to dragging down to close apps. Its pretty natural and makes sense. Its as easy to remember as watching something fall down into a trash can and knowing down is for what ur done with.
Once i remembered that alt+tab / win key + tab, still worked for app switching i was back to my old self.
If you are a true “hardcore” user, you adapt, if ur just old, you whine. The excitement factor with a new OS is learning how to do old things in a new, and hopefully, a better way. That better way may be made obvious to some and less so for others. For insane on the brain users who watch videos while we use word and Chrome at the same time, it may ba harder to do, but its still there.
Here is one prob for me the metro screen fixed. When im watching a video, my other windows, as im movieng them around somehow always end up covering a bit of my video window. If i snap in the metro video player to the side of explorer, it never gets covered and i always see it, while i do my work in PS, Word etc.
…..
O_O Goddammit, look at how much i wrote again, wtf is wrong with me :S
I used the Developer Preview
I used the Developer Preview installed on a touch enabled convertible tablet for about a month and I thought it worked well there, but ended up wiping it and going back to win 7 as the touch screen got extremely wonky after a windows update (likely updated the driver from the version I installed and Win 8 ended up not liking it lol) and made it so that I couldn’t navigate at all without constant random clicking and I did not have the time to mess with it. I’m not running the Consumer Preview on that machine and, again, it is not liking the touch panel and I can’t find the old driver version I used the first go around, so I just disabled it. On a laptop with a smaller screen, metro is okay with mouse and keyboard but I’d like to see the gestures tweaked and be more like Opera’s as right now they require a lot of physical mouse travel to close apps and such. The ability to hold down a key or side mouse button to activate the gesture input, then do a small flick in, for example, the down direction to close an app would be a heck of a lot easier than going to the top of the screen and dragging all the way to the bottom. On a cramped desk or a laptop with a small trackpad, the current movement is a pain. Would it really be hard for them to add a close button that appears on hover?
I’m not saying everyone should hate it, if you like it that’s fine and I’m glad that you are finding it useful. In it’s current form, it just doesn’t work for me. I’m willing to give them feedback and see where they go with it. In the end though, I have to reserve the right to not like it, just like others have the right to swear by it. At least give me credit for trying to give it a fair shake? :).
I get that this is the CP, but I would really like to see them do some sort of gesture intro or help page for the gestures to introduce all the new ways to closing and switching between apps, I think that would go a long way towards letting people have a fair chance at adapting and not getting frustrated. I had no idea the drag down to close was even an option until someone on Tested forums pointed it out, for example :P. Maybe some sort of intro on first boot for OEM machines or setup for self installs. I think I remember there being something like that in Win XP?
I’ll probably leave Win 8 on the laptop for awhile to test and see what tweaks come out. Right now I’m sticking with Win 7 on my desktop as I can’t risk bugs or instability mucking up my schoolwork or writing.
Anyways, I usually try to keep my desktop (er, the software desktop not the physical computer) as free from icons as possible and my taskbar only has a few important programs pinned. I am one of those crazy people that has a bunch of chrome windows, netflix (or more recently WMC TV), Focus Writer, ect open and spread out over the desktop 😛 Having the start menu in the screen lets me glance over at it or usually I dont even have to look at it as I know what the first search result will be and can just win key->type->enter and it opens heh. I just don’t see the point of having to go out of the desktop to metro, and back out even if it is for a split second why take up the whole screen? I guess I could use that explorer search you mentioned to keep me from having to go the roundabout through Metro land.
I don’t know, I just prefer how things are now, I understand why some people like the Metro improvements (the mail app is pretty nice btw) but the full screen experience is just not for me at this time :). I defended myself over at tested in saying that the operating system should ideally be invisible and adapt to the user, not the other way around, and I still think that. Seriously if Metro works for you and improves your experience, that’s awesome and be sure to give them as much feedback as possible to make it even moreso, but I still have some concerns about it before I’m sold on it working to help me, well, work :). I’ll keep on testing periodically and dipping my toes in the Metro pool to see if the water is warm enough for me lol.
heh, by all means post away man 🙂 I tend to ramble and have long posts as well. If only the ExtremeTech forums were still live… I had some mini novels over there! 😀
EDIT: Hmm, do you know of any
EDIT: Hmm, do you know of any way to get the cursor to automatically be in the search box of explorer when i open it with Win+4 (where my explorer icon is)? If I can get it to do that, that would mostly solve the issue of quick searches :).
PS. Not sure if I mentioned it in the article, but I do love the new task manager, file copy stuff, and so far I have been getting network file transfer speeds that are much, much faster than Win 7 to Win 7 using the same hardware! I have to give MS props for that!!
Usually when I do big file transfers over Wifi (G only though I do have a new router coming that has N, a long overdue upgrade!), I usually get about 1 MB/s avg speeds which is really slow, but after installing Win 8 on the laptop, I happened to transfer a movie from the laptop the desktop and saw it shoot up to 8 MB/s, avg’d about 6-7 MB/s which was a big surprise! Dunno if it was just a fluke but I hope not 😀
WTF VM 😀
Oh the side by side
WTF VM 😀
Oh the side by side metro app functionality won’t work in VB, because it only works at 16:9 resolutions. VB even with VB extras installed only allows for 4:3 aspect ratios.
Sad but true.
Turn off pointer integration, it makes mousing into the corners easier, if not you just end up going outside the VM and onto your desktop. It gets very frustrating.
New tip, Windows Key + Print Screen, takes a snapshot of your desktop and saves it to the picture folder automatically, nifty eh?
Really, that printscreen
Really, that printscreen shortcut will be pretty nifty! 🙂 Yeah, they have a minimum 1366×768 resolution to do the 2/3 and 1/3 metro apps, which will be hard to get in a VM.
never like the interface the
never like the interface the w8, I slapped on a Elitebook 2560P decked out and it was some of the worst UI experienced. Most of the power user experience is gone with windows 8, after 4 hours of fiddling around with it I re-formatted and put my W7 pro 64bit back on.
I think windows 8 is more aimed at “grandma / Grandpa ” that dont really know there way around a computer but can easily use the big pretty tiles to help them out.
good try M$ but no cigar 😉
hehe, I can’t say that I
hehe, I can’t say that I blame you 😉
I think grandma and grandpa are going to take one look at Win 8 and ask me wtf that is and where did their Windows, email, and internet go LOL
After I agree to the terms
After I agree to the terms and conditions window and the select the custom install option, t doesnt detect any device drivers. How should i solve that problem?
As in, it’s not seeing a hard
As in, it’s not seeing a hard drive to install it on? You’ll need to power off the machine (close the VM window and it will prompt you, choose to power off), then go into the settings and make sure you have a hard drive attached in the Storage tab. Is there a hard drive attached? Let me know 🙂
If you have Windows 7, a
If you have Windows 7, a better option would be to boot from a VHD with Win8 installed to it. It will give you a better idea of its performance and usability as it uses the physical hardware instead.
http://www.hanselman.com/blog/HowToGuideToInstallingAndBootingWindows8ConsumerPreviewOffAVHDVirtualHardDisk.aspx
That’s an interesting
That’s an interesting solution, I didn’t know about that little Windows 7 feature. Thanks for sharing :).
No matter what I do, I can’t
No matter what I do, I can’t assign more than 1250 MB to Win8 in VirtualBox – Any ideas? I have a 64 bit Windows7 on i7-2630QM CPU – it has 4 CPU’s (8 total, but half are virual) and 6 GB ram. \Any help appreciated!
R
Hmm strange, what version of
Hmm strange, what version of VB are you running?
Failed to open the CD/DVD
Failed to open the CD/DVD image C:UsersmeDownloadsWindows8-ReleasePreview-64bit-English.iso.
Could not get the storage format of the medium ‘C:UsersmeDownloadsWindows8-ReleasePreview-64bit-English.iso’ (VERR_NOT_SUPPORTED).
Result Code: VBOX_E_IPRT_ERROR (0x80BB0005)
Component: Medium
Interface: IMedium {53f9cc0c-e0fd-40a5-a404-a7a5272082cd}
Callee: IVirtualBox {c28be65f-1a8f-43b4-81f1-eb60cb516e66}
it wont allow my windows 8 IDE controller please help i really like the article by the way
hmm, does the IDE controller
hmm, does the IDE controller show up as installed correctly in your Windows Device Manager? What version of VirtualBox are you using? It seems like there are quite a few users with that error. If you have another drive, you might try putting the .iso on that. When exactly does it give you that error message?
I have the same issue on
I have the same issue on Linux Ubuntu 12.10 using Oracle VirtualBox 4.2.6 which is the latest version. Microsoft does not give the MD5 string for the ISO, but I can mount the image and view the contents. It seems that all of the files are there. It is a UDF which I understand to be a subtype of disk image. I have heard that there are issues when opening that type of image. I am just conjecturing at this point and recalling what I have seen on the web. I would recommend anyone wishing to test drive Windows 8 before purchasing the full blown version, search for help on the Microsoft website.
For me, actually running Windows 8 is not a priority. I only wanted to actually try to run it. I’m sure I will see it soon enough at a computer lab somewhere.
This is a good post. I wanted
This is a good post. I wanted to install Windows 8 on my Windows 7 using a Virtual system (vmware or similar) and found a way. I saw a good article about “Install Windows 8 on VirtualBox – http://www.vpswebserver.com/windows-vps/install-windows-8-on-virtualbox” and tried. It worked and still testing the OS.
Windows 8 has a nice interface but it will take some time for me to get familiar. When I start using Windows 8 over virtualbox I get confuse suddenly and searching for the START Button. Gosh there is no Start button anymore :(.